
Those kitchen rolls, like plastic wrap and aluminum foil, drive me crazy because I can’t close my drawers without mangling the boxes. Recently, I finished a family-sized box of Cheerios and realized I could fit the rolls inside, so I wanted to find a way to upcycle it for kitchen storage.
Turns out, I had some plastic holds that I could use to hang it. The cupboard door seamed like a good location since it’s convenient, but out of the way. Now my drawer space is free for other things.
Want to make your own? Keep reading!

Kitchen organizer supplies
- scissors
- Duck Tape
- family-sized cereal box
- plastic stick-on hangers

Step 1: cut down the front of the cereal box
Following the creases, cut about 2 inches down the front of of the cereal box.
To ensure the cuts are even, fold it down and line it up with the edges. Then fold across and cut on that line.

Step 1: cut diagonally upward from the front
Now, from the corners of the cut you just made, cut diagonally upward toward the top corner of the box.
Repeat for the other side.
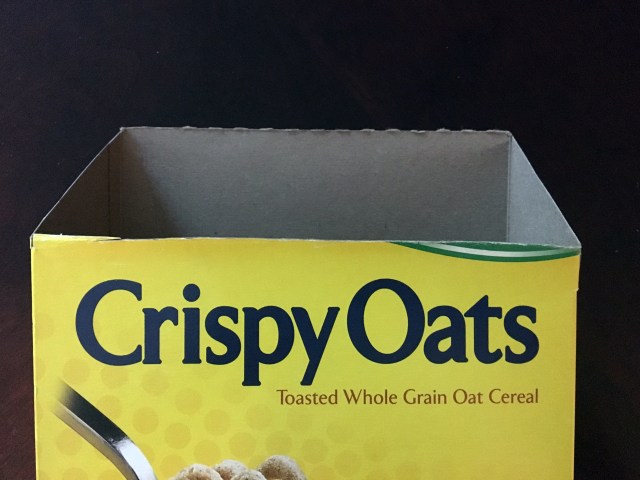
Step 3: remove the back flap of the box
Cut across the top of the cereal box to remove the back flap.


Step 4: Duck Tape the box
Use the Duck Tape to decorate the box. You’ll want to cover the whole thing starting with the bottom and working your way up.

When you get to the top, just fold the Duck Tape inside.

Step 5: place the stick-on hangers
Cut a small hole on the left and right corners of the backside of the cereal box.
Push the hangers through so the flat side is facing the outward.
Apply the sticky tape to the back of the hangers.

Step 6: hang the kitchen organizer
Stick your organizer wherever seems convenient. I choose the inside of my sink cupboard.
Fill it with plastic wrap, aluminum foil, plastic baggies or whatever else you want.
Hope you enjoyed this one. Happy crafting (and upcycling)!

Very nice organizer 😊👍
Thank you! You should try it. Making it doesn’t take long at all.
I ll give a try 😊 thanks for sharing 👍