
I read a lot. Most of the time, I’m reading 2-3 books at once because I like to soak up a lot of information. Topics change a lot too. Sometimes I want to educate myself but other times I’m in the mood for some mindless fiction. It depends on the day.
Regardless, books in-progress need bookmarks. I love the elaborate fun markers, but I can never justify paying for something like that. So, I make my own. And I can make them as exciting as I want them to be.
This week, I’m working on some bookmarks for the corners of the pages. It works really well. They just slide on one of the corners and it’s easy to find your place whenever you’re ready to start reading again.
If you’re interested in making your own, keep reading and I’ll show you how I made mine. Oh, I also have some bonus templates for you to download to make the process easier.
Materials needed for paper bookmarks
- Glue
- Scissors
- Scrapbook paper
- My downloadable template (below)
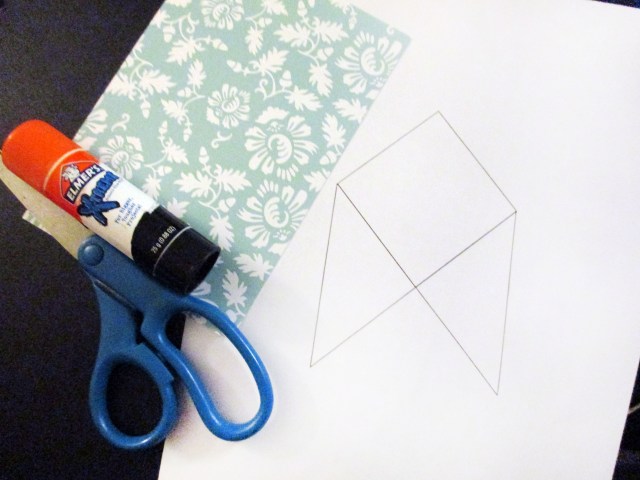
 Step 1: download the bookmark template
Right click the image above and click “Open image in new tab”.
Then, print the image. (file > Print.)


Step 2: cut out the template
Cut the template out. You can do this by printing the template I provided and then tracing it onto your scrapbook paper.
Or you can print it directly onto your scrapbook paper.
Your call.

Step 3: fold the paper
Place the scrapbook paper face down so that the pattern you want displayed on your bookmark is against the surface you’re working on. I want the green flower design, so that is against the table.
Fold one of the legs inward so that it follows the contour of the diamond shape.
Repeat that on the other side. Glue the second leg on top of the other one.
You should have something that looks like this.

I used double-sided scrapbook paper, so I hope the image isn’t confusing. I apologize if it is. Please leave a comment if you need further instruction.

Repeat that as many times as your would like. I made an extra one, just in case I find another book I want to read in the next day or two.
Now you can slide your new bookmark onto the page you want to come back to. It’s so cute and minimal. I love it. It doesn’t stick out from the pages, so the book fits in my bag without any worry of bending or destroying my bookmark.
I have another goodie for you!
If you like to color, download my coloring-page bookmark templates below.

Follow the same steps I provided above and then color til your heart’s content.
For example, I used the pattern in the first template design in a drawing recently. It turned out like this:

I’d love to know what you think and I’d love to see what you make. Leave your thoughts and ideas in the comments.
If you’re interested in some other DIY bookmarks, check these out:
DIY Doodle Bookmarks
These are made from paint samples and Sharpies. The project is super easy and you can turn them into anything you want. I especially enjoy the gradient created from the paint swatches.

DIY Glass Orb Bookmarks
If these didn’t stick out from the edges of the pages, they would be my favorite bookmarks ever. I made these years ago and still use them for books that sit on my nightstand. Not so much for the ones I carry with me.

DIY Autumn-Inspired Leaf Bookmark
I was a bit more in the Fall mood when I made these bookmarks. The leaves were beautiful… all different colors and not quite crispy yet. It was the perfect time to make them into bookmarks.

DIY Watercolor Bookmarks
These were very enjoyable to make. They’re similar to the doodle bookmarks above, except with these you would use thick paper and watercolor paints. Oh, and a marker. You can write or draw whatever you want on them.

Enjoy.
Happy crafting!

Such a great idea for bookmarks – thx
No problem! If you make one, I’d love to see it!
Well I will let you know for sure!
Neat idea. Very pretty.
Thank you!
Great idea! Meant to be starting my masters degree soon so I’ll have plenty of reading to do. Gonna have to make a bunch of bookmarks to mark all those pages!
Oh this is perfect then! Bookmarks galore. What are you going to be studying?
Going to be studying world heritage conservation! Looking forward to starting. I used your template to make some bookmarks yesterday, worked great! Now I have a huge pile made 😀
I love to hear when people make my crafts. So glad it was helpful for you. That subject sounds so interesting! Do you plan to post anything about your studies on your blog? I’d love to hear about it once you get started.
I’m sure I’ll be mentioning it from time to time on my blog, probably in my Not So Crafty Side post series. The course starts next week so hears hoping it’s as interesting as it sounds! 🙂
Good deal! I’ll be looking for it
Cute and not complicated.
Those are the best crafts, aren’t they?
I am ALWAYS in need of bookmarks! Having simple DIY ones like this will help replenish my stash when I either lose or use all of mine!
So glad my DIY was helpful! I lose mine all the time too. I would love to see them if you make them 👏
This is a really cool idea, much better than “just folding the page”. Take a look at what I started using for bookmarks: http://www.italicbookmarks.com let me know what you think or if you would like one!
Pingback: 30+ DIYs and Ideas to Make Corner Bookmarks | Guide Patterns
Pingback: DIY Beaded Bookmarks | Make Something Mondays!
Pingback: DIY Planner Dashboard From A Tissue Box - Make Something Mondays