
I’ve been doing yoga for a long time. Going on 10 years now, I think. My mat is my favorite place because it relieves stress, helps me focus, and gives me exercise.

I’ve even made my own yoga mat cleaner because I bought it so frequently.
I choose to do my practice at home because I haven’t found a studio that I like since I moved. Occasionally, I go with a friend or coworker to a class though, which prompted my craft project this week.
When I go to a yoga class, I just roll my mat up and throw it in my trunk or back seat. During the drive, it usually gets unrolled, which can get annoying, so I decided to make a yoga mat strap to keep it contained.
Why not buy one, you ask? Let’s be realistic here… I’m always looking for ways to make things I could buy. This is no exception. Plus, macrame yoga mat straps on Etsy are like $50. Not that the price is unreasonable for the time commitment, but if I can DIY it, why pay for it?
Want to make your own? Grab the supplies and follow the steps below!

Macrame yoga mat strap supplies
- D-loop rings
- 3mm macrame cord
- Scissors
My content contains affiliate links to products I use and love. If you take action (purchase, subscribe) after clicking the links, I get some crafting money which helps me continue to write awesome tutorials for you! This costs you nothing but enables you to support my work.

Step 1: cut two ropes
Measure 10 arm lengths of macrame rope, twice.
You’ll have two pieces of rope when you’re finished, like in the image above.


Step 2: tie the role to the D-loop ring
This part comes in two steps.
First, take both pieces a rope that you just cut and fold them in half. Pull the loop through the d-loop ring.
Then, pull the remainder of the rope over the d-loop ring and through the hoop you just made.
Repeat with the second rope.

Step 3: create the macrame knots
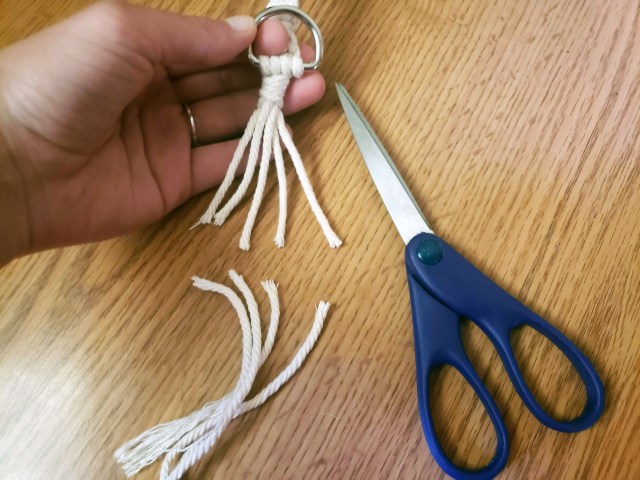
I cut a smaller version of the ropes you just cut to show you how to make the knots.
- Separate your 4 pieces of rope.
- Take the end of the left piece and lay it over the middle two, but under the last one
- Take the 4th piece on the far right and lay it over the end of the first piece and take it under the middle two. Then through the loop created by the first piece of rope.
- Pull them tight to create the knot.
- Continue this process of creating knots until you get to a length that works for you and your mat. This will depend on your hight and the thickness of your yoga mat.

The knots will create a design that twists like in the image above.

Step 4: add the last d-loop ring
take each piece of rope and wrap it around the ring. You don’t need to make any knots here.


Step 5: create a gathering knot
- Cut another piece of macrame rope.
- Make a long loop that faces downward. Leave a little bit on the rope facing upward like in the middle image. Lay this loop on top of the excess rope from your yoga strap.
- Take the longer piece of rope of your newly created loop and wrap it around the excess rope of your yoga strap about 5 times.
- Push the end of that rope through the loop and pull the rope at the top to tighten it.
- You can cut the top rope when you’re finished. Glue it if it makes you feel more comfortable.
Step 6: cut off any excess rope
Cut off any additional rope to create a tassel. You can add beads or anything else you’d like here to beautify it.

When you’re finished, pull your strap through the d-loop rings to create hoops. Place your mat through those hops and you’ve got yourself a yoga mat strap!
This one is a bit time consuming, but worth every second. Find a podcast or show you like and bang it out.
It takes me back to my teen years when I would make and sell friendship bracelets. I definitely used a similar knot, too. After the first two knots, muscle memory kicks in and it’s like you never took a break from it, surprisingly.
The process is also relaxing, so you can expect a few more macrame projects from me.
Let me know what you think. I’d love to see your yoga mat strap when you try it!
Happy crafting!

Pingback: DIY Wine Bag with Macrame Knots | Make Something Mondays!
Something isn’t right about these cord lengths. Ten arm lengths of cord came out to 20′ for me. Folded in half as you said leaves 10′ to make the knots. This came out to 2′ of strap, with a ton extra of the middle cords. Based on my yoga mat, I really need about 30′ of each cord, and to not fold each cord in half because that’s such a waste.
Hm, so you’re saying you don’t have enough length? When I say arm lengths, that is referring to your wingspan, so your armlength measure from one hand to the other when your arms are stretched out to the side. Does that make sense?
That makes more sense! I ended up doing a practice piece of the strap to figure out how much I would need for my mat, which is thicker than the one you have pictured. I only just got the email notification for your reply, so I no longer have my calculations on how much I ended up using.
Thats good to know! My mat is a standard size so anyone who has a thicker mat might have to scale up. Thanks for sharing!
Just wondering if you’d be better not folding in half but maybe a third, with the shorter side in the middle as the outer 2 cords being the working cords will need to be a lot longer than the middle 2 cords or you’ll have a lot left over.
Sure, you could try that! I used the excess for other projects.
Pingback: 19 DIY Macrame Yoga Mat Strap Projects For Complete Beginners